Last change 01/02/2015
Installation and Configuration of SyncKolab. You might need to install the lightning plugin first for calendar/task support! (Make sure to use Thunderbird 3 or newer - older Versions are not supported!)
Preparation
Before using synckolab you need to make sure you have:
- A working imap account
- An imap folder created for EACH type of element you want to sync (calendar/task/contacts need to be in seperate folders!). You should not mix elements in the same folder. This will only confuse synckolab and produce unwanted results up to data loss!
The names of the folders or where they are located within your IMAP account do not really matter, since you will have to select them during configuration anyways. They have to be visible in the "real folders" first - just right-click and you can create new subfolders).
First Time Use
If this is the first time use of synckolab and you have lots of data you want to sync, you really should create a backup of your local profile folder first (the lightning and address book database is located there) - see https://support.mozillamessaging.com/en-US/kb/profiles if you do not know where that folder is located.
In case something goes wrong you can just copy the backup over the original folder on your hard drive and have all your contacts etc. back.
Once the setup is completed you should also run synckolab manually at least once to copy everything locally to the imap folder. The background sync only looks for entries you change. So everything that was already there is just kept the way it is.
Installation
Step 2: Open Thunderbird and use Tools/Extensions then install the downloaded calendar and the synckolab xpi
Step 3: Restart Thunderbird
Step 4: Configure the plugin
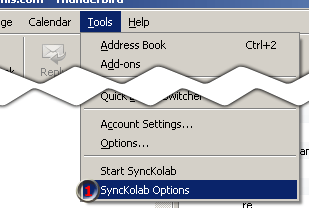
(1) will open the configuration wizard
Optional:
Step 5:
get the icon
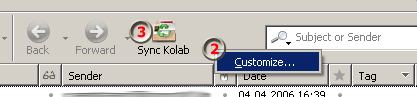
 rightclick on the icon bar (2)
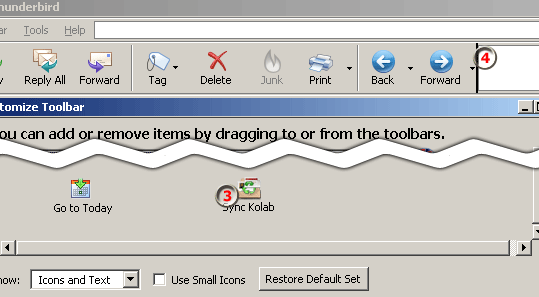
(next to Stop) go to customize and drag the "Sync Kolab" Icon (3)
to the bar (4)
rightclick on the icon bar (2)
(next to Stop) go to customize and drag the "Sync Kolab" Icon (3)
to the bar (4)
Step 6: click the icon or menu entry and the sync will start
Optional: Since you cant drag the button into lightning, try the Custom Toolbar extension and create a new toolbar there.
MAKE SURE YOU READ THE RELEASE NOTES OF THE VERSION!!!
Configuration
You can enter the SyncKolab configuration either using the menu entry, or using the addon-konfiguration. Once there you will see:
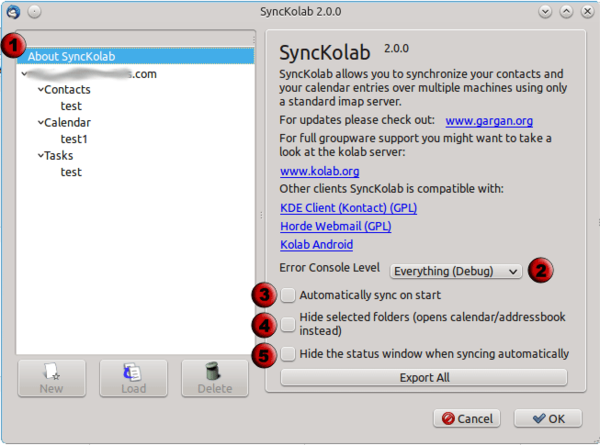
- This shows the configuration tree. Every imap account you have configured in thunderbird will be visible there. Selecting the "About SyncKolab" entry allows to configure "global" parameters
- If you encounter any problems with synckolab (i.e. entries not synced correctly) use this to adjust the debug output. Debug will print pretty much everything on the javascript console.
- If you check "Automatically sync on start", synckolab will run every time you start thunderbird. All active configuration will then be executed
- "Hide selected Folders" will prevent you from accessing the imap folders you selected for sync. Instead of showing the imap content, the addressbook/calendar will open instead.
- ""Hide the status window" will not show a status window when syncing automatically (i.e. on start or usign the timer). instead you can see the progress in the bottom right corner of thunderbird.
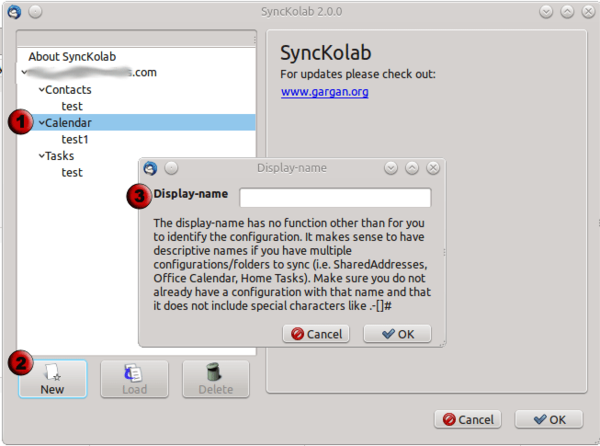
- If you select either "Contacts", "Calendar" or "Tasks" you will be able to add new configurations.
- is then active, if you click it
- will show a dialog box where you can enter the name of the configuration. Make sure not to use any special characters there.
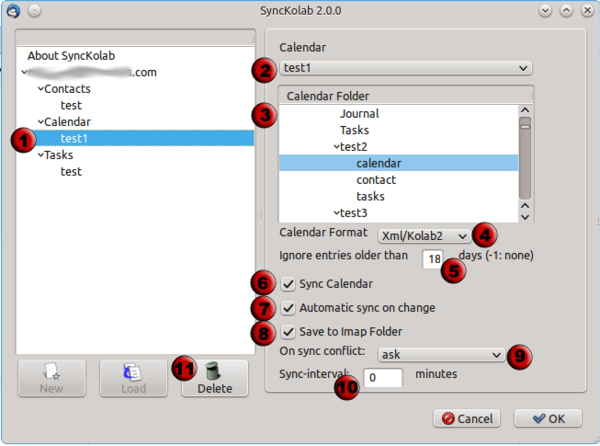
- Selecting a configuratio name will allow you to setup each element.
- This dropdown box lets you select the calendar/adressbook used for syncing
- In the list of folders, select an imap folder to sync with
- Format: Select the (prefered) xml/kolab format or the vcard/ical format. It is recommended to use the xml format because the vcard/ical format is very outdated and not as clearly specified.
- Ignore Entries: this is only available for calendar or tasks. The number of days entered is used to reduce the number ofitems synced. If an entry is older than that number of days, it will be ignored. -1 will sync EVERY item, no matter how old.
- Sync: Unchecking this box means that you do not want to sync the data at all (disables this configuration)).
- Automatic Sync: You need to restart thunderbird for this to be active. Once it is, synckolab will listen on the imap folder and the local calendar/address book for any changes you make and instantly sync. This means, you do not neet to actually run a sync any more. Note: this will only work on changes. To get the initial data, you will have to run the sync at least once!
- Save to Imap Folder: The checkbox is only important for shared folders where you have read-only access. This makes sure synckolab does not try to write any data into the imap folder uncheck this box. This will overwrite the local data on each sync.
- Sync Interval: The sync interval is 0 per default (do not sync automatically). You can change this to the number of minutes between each sync. If you want auto-sync use 5-10 Minutes for autosync in a workgroup. Depending on the internet connection and imap server you can decrease this number.